PVS- Fantasy Flowers
Fantasy Flowers is a work shop that I designed and taught the Pleasant Vally Stichers ,a chapter of Embroiderers Association of Canada.
This page is for the students to help them understand the placement of colour and thread
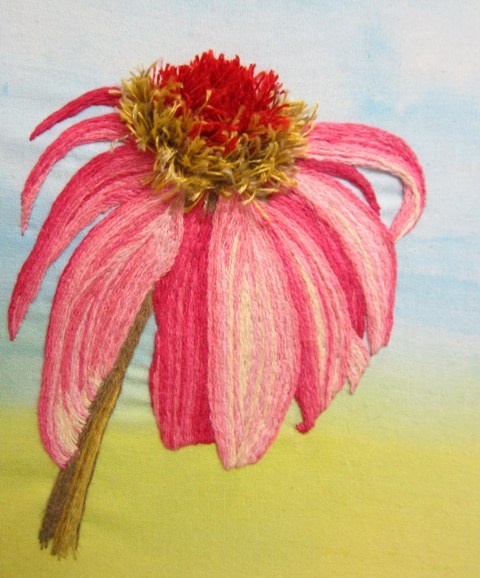
The Flower was inspired by Echinacea and I wanted the appearance of 3D with out the raised work plus to show the ridges of the flower .The technique is Thread shading with Stem Stitch.
I turn my hoop often depending on the direction I am stitching. I perfer to have the "loop" towards me. I use the stab method and at all times the hoop is weighed down on the edge of the table so I can use both hands
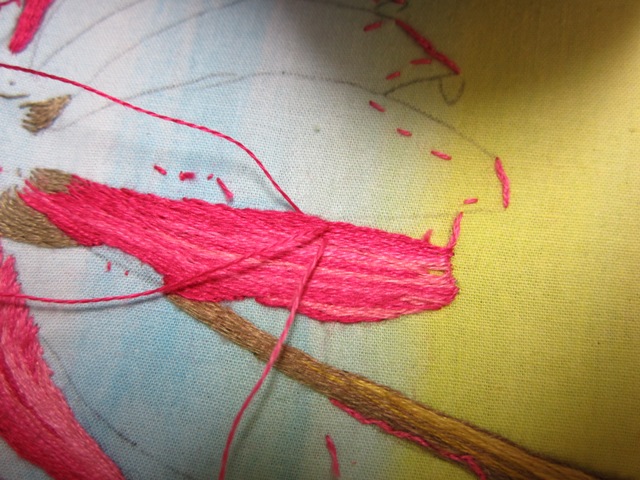
1. the stem
.
Watch the stitch line of the stem do not follow the flower line.
Work from left to right -dark to light


2.
Small split stitches help to support the extra stitches. A number 10 embroidery comes in handy.

3.
Petal 3 I have place a guideline to help placement. I will work on both sides flipping the hoop back and forth


This petal is shadowed by the other petals so fairly dark

Cleaning up a mistake - I started in the wrong area for petal 4


So as not to damage the cotton I very carefully sniped the threads

Petal 4 in the light


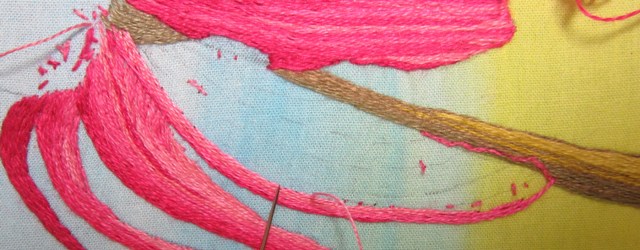
Petal 5 The hoop is flipped so the flower head is to the right

But I did flip it to the left to work on the left hand side


I moved back and forth till it was filled in


6, 7 @ 7a
Petal 6 way in the back so I only used one colour. & & 7a are moving toward the light so I started to had lighter colours towards the right of the petal.

The hoop is placed with the flower head to the left but I still work on both sides to fill in


Stitch one pass of the very dark colour on the left edge will add depth to the petal


A little dark in the center breaks up the colours and again adding depth.

8&9
Petal 9 is not so much in the dark but one colour indicates it is shadowed a bit. Noticed I have stitch just a bit in to the next petal Again will help with depth.

Petal 10 is a different as the light colours are started on the left with darker colours pushing the petal to the back.


Petal 11 is in the shadows

with just small amounts of light playing threw.
It is very important to follow the shape of this petal which is very straight

A grey scale of the picture shows that my shading is working towards the desired look.


Petal 12 one of the 2 larger petals that has a lot of light colour , again I move the hoop back and forth. Noticed the pencil lines? those are guidelines to help place the threads.
I started with 2 very tight passes of the darkest colour and I did not go to the very edge. This is nearly hidden when the other colours are added but again it will had the depth to the petal.


Just showing that there are at least 3 colours and 8 passes in the withed of the needle
I had flipped the hoop to the right and worked on the out line - .

The dark line in the center curve was removed as I didn't like it.

Starting to fill in - Hoop is flipped to the right

The lightest of colours are used to highlight

Petal 13 also in the light and I moved the hoop back and forth to fill in
A couple more very tight rows will help "raise" petal 13


Flipped to the left - Noticed the stitch is on top of Petal 11?


Noticed the top of the petal have short lengths of going back and forth


Last stitch in the petals

The Turkey Knot
first pass

second pass- can you see the 3 different colours?

Using the Laying tool to help control placement

The bar that anchors

It is starting to fill in on hte 3rd row

Part 1 finished
Part 2 coming soon
Comments